Panasonic GH5S & Shooting HDR10
- willem2667
- Jan 8, 2018
- 14 min read

For the last couple of months, we’ve been working with Panasonic to create HDR10 content for the release of their new micro four-thirds camera, the LUMIX GH5S. We are incredibly happy with how well it performed. Besides working with the GH4 for behind-the-scenes and some small aerial shots, we haven't really worked with Panasonic cameras regularly since the days of the original VariCam and HVX200. There was a time when both of those cameras were our go-to workhorses, but in recent years we've primarily used RED and ARRI cameras.
When Panasonic released the current generation of VariCams, we heard great things about Dual ISO and the image quality from fellow filmmakers. We weren't looking for new cameras though, so we never really gave them a second look. But when Panasonic reached out to us about trying out their newest model in the Lumix GH line, we couldn't have been happier to revisit an old friend.
"Horizons" SHOOTING SPECS & GEAR:
2x GH5S w/ PL Mounts Adaptors
Round Front Lomo Anamorphic Lens (35mm, 50mm, 75mm, 150mm)
Tokina 16-28 T3 & 11-16mm
Lecia Summicron-C 35mm & 75mm
Zacuto GH5 Camera Cage Kit
Atomos Ninja Inferno
Overall, we are really impressed with the image quality of the GH5S, especially when mastering in HDR10. Our biggest goal when we started the project was to capitalize on the GH5S' Dual-ISO (400 & 2500) sensor, which delivers excellent low-light capabilities and nearly14-stops of dynamic range. We also wanted to show off some of the other well-known features of its predecessor the GH5, including V-Log L, 400mbps 10bit 422 all-intra internal recording, 4K 10bit 422 60p external recording, and its anamorphic mode, by pushing the camera's capabilities in a professional shooting environment.
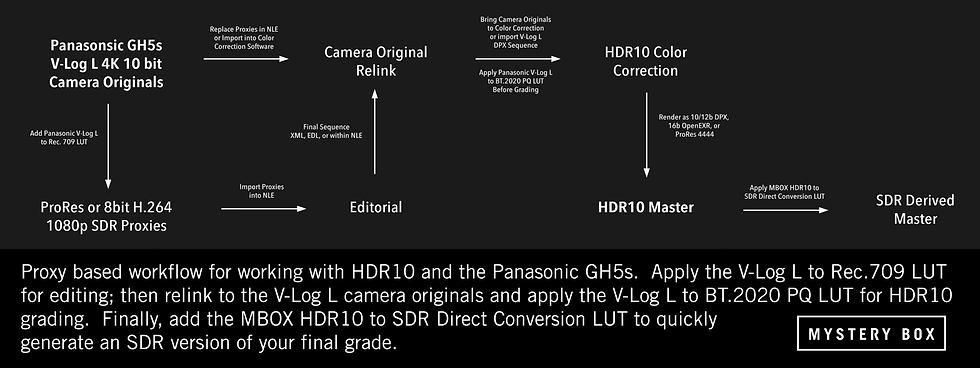
And in the process, we developed an end-to-end HDR10 workflow for the GH5S. The Panasonic LUMIX GH5S makes it affordable to capture, monitory, grade, and master high-quality HDR10, thanks to its internal 4K 10bit 422 internal and external recording, dual native ISOs, V-Log L capture space, and the camera body's low-price.
HOW TO CAPTURE, GRADE AND MASTER IN HDR10 WITH THE GH5S

If you want to work with the Hybrid Log Gamma (HLG) version of HDR, like its predecessor the GH5S has a fantastic native solution for capturing HLG footage. This walkthrough will help you get the best results out of the GH5S for HDR10, also known as SMPTE ST.2084 or Perceptual Quantization (PQ) HDR.
For best results in HDR shooting, you’ll need the following:
Panasonic V-Log L (Included with GH5S)
Atomos Shogun/Ninja Inferno (required for capturing HDR [HDR10 or HLG] in 50p or 60p)
Atomos Media Caddy with SSD
HDMI 2.0 cables, capable of 18 Gbps speeds
V90 class SD Cards (UHS-II / U3 / Class 10 with 250 MB/s Write Speed Minimum)
Image Look-Up Tables for Monitoring, Proxies, and Color Correction
At the moment, the Atomos Shogun & Ninja Infernos are the only HDR capable monitor with a built-in 60p recorder, which is necessary if you want to shoot in HDR10 at UHDp50 or UHDp60. We also recommend using the Atomos Sumo, Atomos Shogun/Ninja Flame, SmallHD 1703 P3X, SmallHD 1703 HDR, and the SmallHD 503/703 UltraBrights for HDR monitoring only.
We’ve broken down this walkthrough into four main sections:
GH5S Camera Settings for HDR10
Shogun/Ninja Inferno Setup for Panasonic HDR10 Workflows
Exposing for HDR10 with the Shogun/Ninja Inferno
Post Process & Color Correction
GH5S Camera Settings For HDR10
When recording for HDR10, image quality and compression levels matter. The internal 10bit H.264 on the GH5S is fantastic for 24p/25p/30p recording, and rivals ProRes in quality. For shooting in 50p or 60p, recording ProRes on the Atomos Ninja Inferno is essential since the camera can only record in 8 bits and a minimum of 10 bits per channel is required for HDR work. See our article on HDR Video for the reasons why.
To set the proper compression levels and to capture in a format that maintains proper timecode (necessary for proxy workflows), switch your camera to record in a Quicktime MOV container:

Set the GH5S to record using a Quicktime container, by going to your Rec Format menu (Menu -> Motion Picture -> Rec Format) and set the container to QuickTime MOV:
Then, in your Rec Quality menu (Menu -> Motion Picture -> Rec Quality), set your quality and frame rate.
For shooting in UHDp23.976, select 4K UHD, All Intra-frame, 400Mbps 24p (4K ALL-I 400M 24P).
For shooting in UHDp50, select 4K UHD, 8bit, 150Mbps 50p (4K 8bit 150M 50P
For shooting in UHDp59.94, select 4K UHD, 8bit, 150Mbps 60p (4K 8bit 150M 60P)
Note that which frame rate options you have available will depend on what your camera’s system frequency is set to (NTSC, PAL, Cinema). Setting your frequency to NTSC enables the progressive frame rates of 23.976 fps, 29.97 fps, and 59.94 fps; to PAL enables 25 fps and 50 fps; and to Cinema offers 24fps.

Set the record quality to the best available for 23.976 frames per second by setting the GH5S to 4K ALL-I 400M 24P in the Rec Quality menu (Menu -> Motion Picture -> Rec Quality)

Set the record quality to the best available for 59.94 (50) frames per second by setting the GH5S to 4K 8bit 150M 60P (50P) in the Rec Quality menu (Menu -> Motion Picture -> Rec Quality). This will set the frame rate, though actual recording at 60P (50P) must be done on the Shogun/Ninja Inferno.
For HDR shooting you must capture in 10 bit, so 50p/60p recording requires capturing in ProRes on the Atomos Shogun/Ninja Inferno. Set up the GH5S to trigger recording on the Inferno by enabling three HDMI related settings: HDMI Timecode Output, HDMI Recording Control, and the HDMI Rec Output for 4K 50P/60P:

Turn on HDMI Time Code Output so the Shogun/Ninja Inferno can match and record timecode (Menu -> Motion Picture -> HDMI Time Code Output):
Turn on HDMI Time Code Output so the Shogun/Ninja Inferno can match and record timecode (Menu -> Motion Picture -> HDMI Time Code Output):

Turn on the HDMI Recording control in the HDMI Rec Output menu. Ensure that info display, down convert, and LUT HDMI Display are all off.
Set the camera’s HDMI output for 4K/60P or 4K/50P to operate in 4:2:2 10bit, rather than the default 4:2:0 8bit (Menu -> Motion Picture -> HDMI Rec Output):

Ensure the GH5S is outputting 10b 4:2:2 video over HDMI for 60P (50P) for the best image quality on the Shogun/Ninja Inferno. This is necessary for HDR.
For 24p recording on the Atomos Shogun/Ninja Inferno, you’ll need to set your Time Code over HDMI and HDMI Recording Control (steps 1 and 2) as above, though setting the 4K/60P output over HDMI is unnecessary - 10 bit will be selected automatically by the camera.
HDMI Note Your HDMI cables need to support HDMI 2.0 (18Gbps) or higher for 50p or 60p capture. Many inexpensive HDMI cables are not capable of achieving the listed standard speed, so be sure to test any cables you plan on using with the GH5S and the Ninja Inferno to ensure they support 4K 60P / 4K 50P 10bit 4:2:2 transmission. If the cable doesn’t support it, you’ll notice the Ninja Inferno cutting out and flickering during capture, and segmenting the ProRes clips as if you had started and stopped the camera each time.
We brought in multiple brands of HDMI cables, and found that the Rocketfish cables gave us the best results.
The GH5S comes with a variable shutter which controls both the exposure and the look of each frame. Setting your shutter speed to 180 degrees allows the camera to match the motion blur and standard exposures of traditional cinema, as well as eliminating the effects of rolling shutter:

With the camera in Creative Movie Mode, set the shutter angle to 180 degrees to eliminate rolling shutter and to give a cinematic look.
Shooting for HDR10 requires a log curve capture on the camera to preserve all of the camera’s dynamic range. Switch to V-Log L mode by first activating V-Log L per Panasonic’s instructions, then setting the Photo Style to V-Log L:

Set the GH5S to use V-Log L color science by setting the Picture Style to V-Log L in the Picture Style menu (Menu -> Motion Picture -> Picture Style)
ISO & Dynamic Range Note The camera has two native ISOs: 400 and 2500 in SDR, or 800 and 5000 when shooting in HLG or V-Log L. Plan on filming using one of these two ISOs, as they offer the greatest dynamic range.
The camera works by rating the sensor at one of these two ISOs and then virtually adjusting the ISO to your selected ISO. When possible, the camera selects a native ISO greater than the selected ISO, i.e. ISO 400 for ISO ranges 160-400, and ISO 2500 for all ISOs greater than 500. You can also fix the ISO to one of the two circuits (low or high) which reduces the available ranges, but prevents the camera from suddenly changing ISO mid shot.
For instance, if you select an ISO of 800, the camera operates internally at 2500, and selects for the brighter portions of the range for a dynamic range loss of 1.64 stops, lowering your clipping white point. When selecting an ISO of 5000, the camera again operates internally at ISO 2500, and selects for the darker portions of the range, resulting in a dynamic range loss of 1 stop, and increasing the signal to noise ratio.
You can calculate the dynamic range loss with the following two equations. Notice the applicable ISO ranges.
Rated ISO is lower than the native ISO (ISO 160-320, 500-2000): Stops of dynamic range lost = (LOG (Native ISO [400 or 2500] / Selected ISO)) / LOG 2
Rated ISO is greater than the native ISO (ISO 3200-51200): Stops of dynamic range lost = (LOG (Selected ISO / Native ISO [2500])) / LOG 2

When the selected ISO is greater than native ISO, stops lost can be converted into an equivalent decrease in the signal to noise ratio, where each 1 stop equates to a -6dB loss in SNR.
When shooting for HDR10, you want the camera to capture as much of the available dynamic range as it can for you to work with later in post-production. As a result, plan on rating the sensor at either ISO 800 or 5000 for HDR10 shooting in V-Log L
White Balance Note
It’s essential that you capture the image with as close to perfect white balance as you can. While there are small corrections you can apply in post production, improper white balance usually results in a 1-2 stop loss of dynamic range and a compression of the available colors.
As with other cameras that shoot in chroma subsampled video formats, the video files bake in the sensor’s RGB balance and can discard subtleties of tone and details in gradients of all of the colors, leading to blockier and flatter textures. The 10 bit internal recording helps substantially to minimize this effect, but will still cause problems if the divergence between the selected white balance and the actual color of the light is too high.
Set the camera’s white balance to match your lighting setup or use an 18% neutral grey card to measure and automatically set the white balance using the camera's programmable white balance feature. We would always encourage using a professional grade neutral grey card over another white object to set your white balance for three reasons: most white objects can have slight color tint that you can’t see with your eye but the camera can perceive, especially if they’re partially shadowed (like the folds in fabrics; if you clip on your exposure on the white object you’ve lost balance data; and the color of light matters the most in the lows for HDR10 - neutral grey selects for the white balance at the light levels reflected by most lighter skin tones. The procedure is identical to measuring and setting the white balance on the GH5, and can be found on page 110 of the GH5 manual here.
Now that you’ve got the camera set up to capture at the best settings for HDR10 workflows, you’ll need to configure the Atomos Ninja Inferno to show you what you’re capturing.
Shogun/Ninja Inferno Setup For HDR10 Workflows
With the Atomos Shogun/Ninja Inferno it’s possible to monitor in HDR while capturing in ProRes 422 UHDp60, which makes it a very useful piece of kit for an HDR10 pipeline.
As we mentioned in our post about using the Atomos Sumo and SmallHD 1703 P3X for HDR10 color grading, we strongly discourage using ATOM HDR for HDR10 monitoring, since it compresses the very wide HDR dynamic range into the small dynamic range of the display, giving you a washed out image. The Inferno has the same issue.
So, in order to get the best results using the Atomos Shogun/Ninja Inferno for HDR10 video you’ll need to set up the display by applying a custom utility LUT.


To load the LUT, first use the Shogun/Ninja Inferno to format an Atomos caddy with an HDD or SSD. Then, attach the caddy to your computer. Copy the custom LUT file to the root of the volume, and eject the caddy.
Reattach the caddy to the Shogun/Ninja Inferno. In the MONITOR MODE menu, select “CUSTOM LOOK” from the four color options at the top of the panel:

First select "CUSTOM LOOK", then select and empty LUT slot, and tap the folder to load a custom LUT.

Select the Custom LUT to monitor in HDR.
In the CUSTOM LOOK settings group, select an empty Look slot (1-8) and tap the folder icon to the left. You should see the Custom LUT appear in the list. Double tap the LUT to load it to the look slot. This only needs to be done once, so long as you do not overwrite the look.
With the LUT loaded, slide the brightness slider to full, or reduce the brightness to match the ambient condition.
This look takes the V-Log L image coming from the camera and converts it into the Shogun/Ninja Inferno’s native dynamic range and color space. It allows you to a) see most of the dynamic range the camera is capturing in a b) normalized contrast curve, by utilizing the greater brightness range of the Shognun/Ninja Inferno.
The LUT does clip the details in the darks, since the display is only capable of 10 stops of dynamic range. When you want to see all of the detail the camera is capturing, we’ve found that toggling the LUT on and off (by switching to standard Rec 709 mode) the most useful, rather than using ATOM HDR to scale the whole image into the Inferno's dynamic range. Watching your histograms on both the camera and the display also lets you see how much detail you’re retaining in the darks and whites, while the LUT allows you to see the overall contrast of the shot. Note that the histogram on the Atomos will show you the effects of the LUT, rather than showing you the values of the captured V-Log L.
We should note that when using the LUT it’s important to ensure that option to “REC LOOK” is DISABLED in the Shogun/Ninja Inferno’s MONITOR MODE menu. This allows the Inferno to record the input signal to the ProRes file without applying the look file to the captured image.
If you are using another on-set monitor and looking the signal through the Shogun/Ninja Inferno, you can add the look to the output by selecting the “OUTPUT LOOK” option here, or bypass the conversion to use dedicated LUTs on other devices.
Exposing For HDR10 With The Shogun/Ninja Inferno
With the look applied to the Inferno, you should be able to see the overall relative contrast by eye, though your highlights will be slightly more compressed than they will be in full HDR10, and your blacks will be slightly clipped.
In HDR video, it’s important to minimize the amount of clipping in the bright areas of the image. For an in-depth discussion of the hows and whys, review our post on Shooting for HDR.
To allow the Shogun/Ninja to highlight which parts of the image will clip in the output HDR video, configure the Zebras in the MONITOR ASSIST menu. Set the threshold to 105%. This will apply the zebra pattern to any part of the image where you’re clipping in the V-Log L signal (approximately 1200 nits).
The LUT is designed to recover about a stop of what appears clipped when viewed with the LUT, but you will not be able to recover anything in the zebra’d area.

You can also check your exposure using the Exposure Assist feature of the Shogun/Ninja Inferno. Expose caucasian skin tone as green, with bright spots of neutral grey, and the roll off into the darker grey. This yields optimal exposure and highlight retention. In color correction later, this will place the skin tones at the target brightness (about 120 nits). Here again, anything that reads as red on the exposure assist is clipped in HDR. Do not confuse the orange and red; combine with a check against the zebras and the histogram to see if highlight detail is clipping.
When recording clips on the Ninja Inferno, use 10 bit ProRes 422 HQ. This reduces the amount of noise introduced in compression, and provides the best image for HDR grading and further color correction.

Post Process & Color Correction
Editing and Proxy Files
The camera original files or files from the Ninja Inferno are directly usable in Adobe Premiere or Final Cut Pro for editing, though in our experience you may still want to use a proxy workflow. The built-in H.264 decoders in nearly all computers is only an 8 bit decoder and so playback of the camera H.264 places a hefty load on the CPU and GPU, and can cause significant slow downs, while the high frame rate ProRes is data heavy and requires RAIDs for real-time editing.
We recommend using a proxy workflow for editing, using 1080p ProRes 422 or H.264 proxy files (in QuickTime MOV) for the edit, rather than the full resolution 4K files. This lets the files read from disk 4-10x faster, and by burning in the V-Log L to BT.709 SDR look, you won’t place additional load on your processor.
Prepare your H.264 proxies by applying the custom look file, in the processing program of your choice. Use the resolution 1920 x 1080 for your proxies if you shot at UHD, or 2048 x 1080 if you shot at cinema 4K. When you render, ensure that your proxy file names match the original camera file names exactly (including file extensions), and that your container handles timecode - be careful to not overwrite the camera originals!
We’ve found DaVinci Resolve to offer the best speed and quality when preparing our proxies, and would recommend it for proxy generation, especially if you are mastering in Resolve later. If you are doing a 60->24 slow motion effect, we strongly recommend applying the frame rate interpretation in Resolve and rendering out proxies using Resolve timecodes, since this will help when relink to the RAWs later.
If you don’t want to relink to the RAWs in DaVinci later, and would prefer to relink to them using your editorial program, you can relink them in your editorial program of choice and export a 10 bit DPX sequence without LUTs to send to color correction.
Color Correction & VFX
For color correcting and mastering in HDR10 we recommend against using editorial programs such as Adobe Premiere and Final Cut Pro X. As we discussed when Adobe first added “HDR” tools to Premiere, Adobe’s choice to limit the available color and brightness range to SDR only when working in HDR is severely problematic.
With the 10.4 release of Final Cut Pro X, Apple has recently added HDR grading tools to their application, but their implementation has its own problems, especially with respect to how they handle the desktop viewer, managing LOG/camera color space footage, and their implementation of LUTs. When operating with a library and project in HDR mode, the viewer hard clips at the brightness level of the display, the input color spaces are not assignable to camera color spaces and LOG curves, and applying LUTs had strange effects on clipping and scaling. FCP-X does, however, actually output an HDR image to both the viewer and to an attached reference display - which means you can actually grade with it, but you may find you can't use the same LUTs to convert your LOG footage to HDR as elsewhere to speed along the process.
Here again we recommend using a color space agnostic color engine, like DaVinci Resolve Studio. Check out our blog post here for more information on how to pick a color engine and managing modern multiple color space workflows.

Using custom utility LUTs provides an ideal starting place for HDR10 color correction. We still recommend using an output compression curve to reduce racing through the highlights when adjusting lift, gamma, and gain, as we outlined in our post on Grading, Mastering, and Delivering HDR. Grading should be done after the applied LUT.
For applying VFX to your GH5S footage, such as background replacements, paint outs, or digital insertions we recommend working in either the native V-Log L, or applying the V-Log L to BT.2020 PQ LUT to work in the wider space. Working in HDR in VFX allows you to combine and matte in assets filmed using other cameras, or that already exist in SDR or HDR.

Lastly, no workflow is complete without considerations for delivery. See our post about grading and mastering in HDR for more details on that process.
Whether you're new to shooting and delivering in HDR, or have been practicing for a while, the Panasonic GH5S with V-Log L enabled provides a fantastic starting point for an all-HDR10 workflow. We look forward to seeing what kind of content you can create.

Written by Samuel Bilodeau, Head of Technology and Post Production


Impressive work on HDR10 with the LUMIX GH5S. It’s great to see practical notes on performance and the choices you made to get a solid HDR10 workflow. The use of Dual ISO history is especially interesting, and I appreciate the context comparing Panasonic with the RED and ARRI setups you’re used to. If you need a quick way to unblock websites during research, unblock websites could be a handy tool, but the real value here is the filmmaking detail.