2018 Mac Mini Editor's Workstation
- willem2667
- Jan 28, 2019
- 12 min read

Mystery Box was in the market for a new dedicated editing machine. To be honest, when Apple announced the 2018 Mac Mini, it wasn’t on our radar. Instead we were eyeing another iMac Pro to compliment the unit currently occupying our coloring space. Then we saw the specs of the Mac Mini’s top-level configuration. After some investigating, we believed this little machine would hang with the iMac Pro as a purpose-built editor. It is now 2 month since we received our Mini, and we can safely say, the 2018 Mac Mini can edit at the same level as our $12,000 iMac Pro.
Our Mac Mini’s Specs
Intel Core i7 3.2GHz (4.2 boost clock)
64GB 2667GHz DDR4
1TB SSD
Sonnet Breakaway Box 650
Radeon Vega Frontier Edition 16GB
LG Ultrawide 34 (3440 x 1440)
MacOS 10.14.2
FCPX 10.4.4

Expectations
Before we talk about our experience with the Mac Mini, it is important layout the expectations we have for this machine. It is our hope the Mac Mini will fulfill the role of a dedicated editing machine. As a company that regularly shoots and delivers in 8K 60p HDR, we aren’t expecting this to grade 8K .R3D files at full debeyer. We have more powerful machines dedicated to finishing in delivery formats. Our hope is the Mac Mini will fit well into our current offline/online workflow, and have enough power to handle some of the more system-taxing codecs such as the HEVC 4K 10bit files coming out of the GH5. We have been very pleased with the iMac Pro’s performance, but not its price tag. When the 2018 Mini was announced, we started comparing the two machines. Some would consider this an unfair comparison, but they are more alike than you might think. While the iMac certainly costs more, the Mac Mini isn’t cheap either. The maxed out version is around $4,000. Then add on the monitor, peripherals, and the all-important eGPU and it’s closer to $5,000, more on that later. Even so, that’s less than half the cost of the iMac Pro.
An Editor’s CPU Workloads
The Mini won’t come with the amazing 18 core Xeon found in the iMac. In its place is a 6 core i7. What does this mean in real-world terms for an editor? Not much. These two CPUs have a similar boost clock, but the base clock speed of the smaller i7 is 3.2GHz while the Xeon is based at 2.3GHz. For programs such as FCPX and Premiere, having 18 cores does very little for editing/exporting performance. In our experience, Premiere hardly ever engages more than 6 cores. A similar story can be heard from the FCPX users. This is why Adobe recommends a good balance between core count and frequency when building a system. As for single core software (looking at you, After Effects) we have actually seen slight performance increases over the iMac Pro as the single core frequency of the Mini rarely drops below that 3.2 base clock. For a machine that will be cutting video in FCPX 8 hours a day, 5 days a week, the i7 of our Mac Mini is the perfect match.
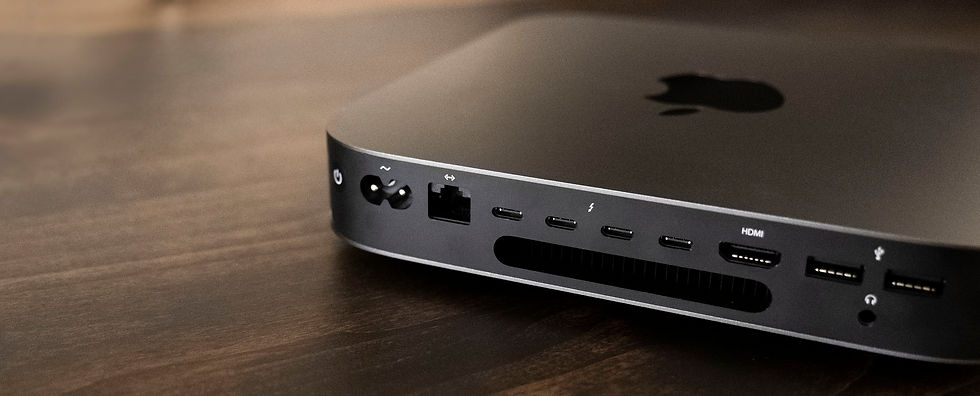
Media Storage
For the independent editor/videographer, the built-in PCIe-based SSD, which is configurable up to 2TB, will be a welcome addition. When larger storage is needed, four Thunderbolt 3 ports (sharing two buses) will ensure fast read/write speeds to an external SSD or RAID solution. These drives are certainly fast enough for most heavy footage, but in a multi-workstation environment where projects are accessed on several machines, centralized storage is an obvious requirement. Fortunately, the Mac Mini is also configurable with a built-in 10GbE. This is a huge plus for the Mini in our book. It just so happens the Mystery Box studio is wired for 10GbE and has a dedicated lane to the the high speed NAS, just for the Mini. The connectivity of the 2018 Mac Mini is rivaled only by the iMac Pro, which adds an SD card reader and 2 additional USB 3.0 ports. Independent content creators and post-house environments alike should be able to find suitable media storage solutions fairly easily with this array of ports.
Overcoming the Heat
Over the past decade, Apple has continually shown the market it’s preference of style and user experience over performance. An unfortunate side effect of a thin chassis and near silence is a constant limitation in their computing potential. The new Mac Mini is no exception. Our initial tests revealed blazing temps and slightly throttled performance. We were actually impressed with how little throttling took place. Despite temps reaching into the 90’s the i7 continued at or above its base clock. Not only where the temps high, but the Mac Mini crashed on several occasions during that first week. We thought it strange, however, through all the 4K 10bit playback torture tests, we never once heard the fan kick up. Apple boasted the 2018 Mac Mini’s improved cooling with a newly designed exhaust fan, but our machine still struggled to keep temps down. MacOS does not support custom fan curves natively, so there was no way to manually crank up the fan. This led us to a 3rd party solution, a simple app called Macs Fan Control by CrystalIDEA Software. It was exactly what the doctor ordered. After installing the app and manually adjusting the fan speed to allow for higher RPMs, the throttling was completely gone and so were the occasional crashes. As is to be expected, the noise level of the fan obviously increased with the higher RPMs. On the Mini’s default fan curve, the fan never went over 1800 rpm. Our custom fan curve reaches up to 4,200 rpm whenever heavy work loads come into play. The single exhaust vent in the rear of the Mini is now a blow dryer as the fan performs its designed function. When given the option of performance or silence, Apple chose silence. For our editing machine, we choose performance. This simple app changed the entire experience for us.

Age of the eGPU
External graphics cards are not new. The CUBIX Xpander was a popular PCI expansion box in the professional market back in the days of the tower-style Mac Pro, which would allow for multiple external GPUs. For the past 3 years many gaming companies such as Gigabyte, Razor, and Alienware have made eGPUs available to the consumer markets. This is in-part due to advances in connectivity protocols. Thunderbolt 3 has opened up a lot of doors to external expansion devices with its high bandwidth, something a modern GPU needs plenty of. Just as important as the connection speed though, is the software support. No matter how fast your eGPU is, if the program in use is not designed to communicate with the GPU, it will become little more than a huge paper weight on your desk. This has been the biggest roadblock for the eGPU market in the last few years. Many users complain about lack of utilization or compatibility issues. We feel eGPUs have matured enough, especially on the Mac side, to be considered viable in the professional workspace. Our test results certainly present a strong argument in their favor. This optimization will only increase as Apple relies more on TB3 expansion to keep devices compact while pandering to the professional market.

eGPU Performance
Our current NLE of choice at Mystery Box is FCPX. Thus our testing has been FCP workflow centric. We wanted to compare 3 display configurations while running an average Final Cut project on the Mac Mini to decide how much a performance gain could be expected from our eGPU configuration.
The Sonnet eGFX Breakaway is one of the recommended eGPU boxes by Apple and the only unit on their list capable of powering the Vega Frontier. The other popular choice is the Blackmagic eGPU Pro. The downside of the Blackmagic being the GPU is not upgradable nor is it as powerful as the Vega Frontier, sporting the RX Vega 56. The Sonnet combined with a Vega Frontier seemed like the clear choice for maximum GPU power.
As with any performance test, the results will greatly vary depending on the codec and bitrate of the files you are working with. Until now, the most demanding footage we have to work with is the GH5’s 4K HEVC 10bit footage. Anything above that is recorded with ProRes proxies, a format FCPX is well-equipped to handle. Thus 4K HEVC 10bit became our main specimen. The 2018 Mac Mini has an interesting trick up its sleeve for this particular codec, but more on that in a minute.
Davinci Resolve allows the user to define whether the default GPU is being used as the display monitor only, or if it will put idle resources to work in helping with the graphic compute load. FCPX does not have such controls, but will act differently based on how you connect to the monitor. If the monitor is plugged directly into the Mac Mini (via HDMI or TB), then any connected eGPU will act as a compute-only GPU. On the other hand, if the monitor is connected to the Mac Mini via the eGPU, that eGPU becomes both the GUI and compute video device. Both configurations have their benefits. If you are trying to take as much load off the Mac Mini as possible, connecting the monitor to the eGPU is the way to go.
3 Display Configurations Utilized The EGPU In Different Ways:
No eGPU connected (rely completely on the internal Intel UHD Graphics 630)
eGPU as compute only (Mac Mini connects to monitor and eGPU separately)
eGPU as GUI and compute (Mac Mini connects to monitor via the eGPU)

Important Notes About Our Test
*Note: MacOS allows the user to define whether each individual software prefers the internal graphics or a connected eGPU. To configure any app to prefer the eGPU, navigate to your app list, right click on the desired app, click “Get Info” and make sure the “Prefer External GPU” box is checked. This will significantly change your experience with an eGPU.
*Note: To see how hard we could push this system, we left FCPX playback set to “Better Quality”. Switching the playback setting to “Better Performance” dramatically increases the smoothness of playback without a noticeable drop in picture quality.
*Note: Using other the other Thunderbolt devices along with an eGPU will have an effect on performance. We noticed that even when an attached device wasn’t in use, the eGPU would take a hit. There are four TB3 ports, but only two buses. High bandwidth devices like an eGPU should not share a bus with any other device.
*These test only reflect 4K HEVC 10bit footage workflows. We found our Mac Mini / eGPU combo to be more than capable to handle PreRes, H.264, and AVCHD codecs.
Configuration #1 (No eGPU)

HEVC files, as it turns out, are an interesting case study for the Mac Mini. Remember that trick up its sleeve? It has to do with the built-in Apple T2 Security Chip and the 8th Gen i7 processor. The Coffee Lake chipset has built-in HEVC encoding hardware acceleration, and the T2 chip, while designed for security encoding functions, was also reported to handle HEVC loads. Any other codec at 4K and this high a bit rate would be impossible to edit on this machine without an eGPU, but the chipset takes much of the load off the built-in Intel 630. With no way to monitor the T2’s usage, it’s hard to say whether the CPU or T2 is carrying most of the load, but it is clear the Intel UHD 630 sees little usage with HEVC 10bit work. While it’s not the smoothest experience, it is doable. It drops frames fairly frequently but we were pleasantly surprised to see it handling such demanding footage on its own. Not recommended, but doable.

Configuration #2 (Compute-Only eGPU)

In this setup, if FCPX is not set to “Prefer External GPU” (see note above) the chipset will try to take on the HEVC codec and render the eGPU useless. For our test, we manually set FCPX to prefer the eGPU. Other codecs will utilize a connected eGPU regardless of preference settings. This configuration sees large improvements over configuration #1. While 10bit 4K HEVC playback is smooth for the most part, occasionally performance drops and stuttering occurs.
It is a completely different story when working with other popular codecs like h.264, AVCHD, and ProRes. These files utilize the eGPU well, and don’t call on the chipset for help. Another interesting note is that FCPX does not classify a single stream of 4K HEVC 10bit as requiring rendering. Any clips that require rendering in the timeline will be marked with a dashed line. This means the only way to get consistently smooth playback is to switch to “Better Performance” in the viewer settings.

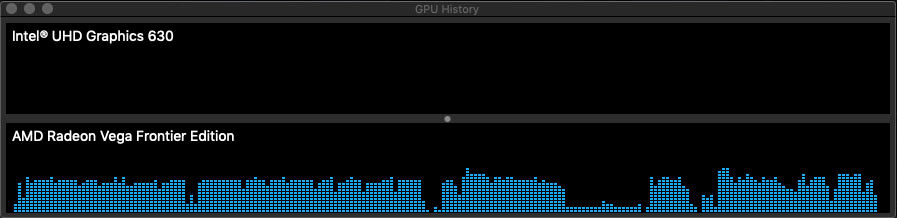
Configuration #3 (GUI + Compute eGPU)

Similar performance here to configuration #2, with one small difference. Now the Intel UHD 630 is completely inactive and the eGPU carries the entire load. Strangely enough, the Vega seems to like working alone. Playback is smooth until the VRAM fills up, just as before, but as you can see from the GPU usage graph, the Vega holds on a little longer between performance dips in this configuration. While there is only a slight performance gain over configuration #2, the Mac Mini a bit cooler during playback.
Recommended EGPU Configuration
Based on these test, we feel it is best to offload as much graphical load as possible to the eGPU. Configuration #3 seemed to do this the best. Another factor that comes into play is heat. Allocating more computing workload to the eGPU means less heat on or near the CPU. Keeping the Mini cool equates to better performance and a longer life.
Connect the monitor to the Mac Mini via the eGPU
Make sure FCPX is set to “Prefer External GPU”
Set the viewer to “Better Performance”
In this configuration our editing experience with 4K HEVC 10bit footage is a pleasure. Adding effects, coloring, subtitles and motion templates didn’t slow it down. In fact, effects and overlays are all GPU tasks, meaning you will see more usage out your eGPU investment. If your timeline ever becomes too heavy, let go of the mouse and watch the real magic happen. (more on eGPU usage during background rendering below)
Separation of Powers (Multicam Footage)
Multicam footage adds another layer of difficulty to an editing machine. We recently completed a project shot on 3 GH5s cameras at 4K 8bit. If you haven’t read our article on the GH5s be sure to give it a look. The HEVC files from camera were made into multicam clips in FCPX. Since the purchase of the Mac Mini was made halfway through the editing of this project, we thought it would be interesting to compare the new Mini to the iMac Pro that was used for the first half of the project. The iMac could handle 1 angle at a time, no problem, but when enabling all three angles in the viewer it couldn’t keep up and frames were dropped frequently. With our Mini it was a different story. All three angles playing back in realtime, with no noticeable stuttering.

After playing with both for a while we came to this conclusion: Our iMac Pro boasts a very similar GPU to the Frontier connected to our Mini. The Radeon Vega 64 is also a 16GB card. The big difference is sharing GUI and compute workloads. With our eGPU we have the option to hand off the GUI workload to the internal graphics while the Frontier focuses completely on the video decoding (Configuration #2). The iMac Pro, having only a single GPU must push the image to the display while simultaneously decoding 3 sets of HEVC files. We love the 5K display of the iMac Pro, but it is 5K. That’s a lot of pixels to push. Our Mac Mini on the other hand is connected to an LG Ultrawide at a resolution of 3440 x 1440. Having the option to delegate smaller tasks like running the display, while saving the Frontier for the heavy lifting is exactly the kind of modularity we find so attractive in an editing machine. The iMac Pro may have a lot more raw power and a beautiful display, but our purpose built Mac Mini performs editing just as well, if not better in some unique cases, purely because modularity allows us better resource management.
*Note: We also tried 3-angle multicam clips at 4K HEVC 10bit. This proved too much for our setup. Too many dropped frames and stuttering for effective editing. We ended up switching to a single angle viewer mode and just using the number keys to cut between angles for 10bit multicam clips. No issues there.
Background Rendering In FCPX
When the timeline is not being activity used, FCPX utilizes idle system resources to render and cache optimized media files. This is perhaps where our eGPU shines the most. If you really want to have a good multicam 4K HEVC 10bit editing experience in FCPX, just let go of the mouse for a few seconds. As soon as FCPX detects inactivity, the eGPU fans spin up, and we see 100% usage out of our Vega. It is truly impressive to see how fast the Vega Frontier chews through the timeline. Un-rendered clips are marked by a dashed line above them in the timeline. When the dashed line is gone, optimized media has been cached for that clip and you no longer have to worry about stuttering playback.


Conclusion
This brings us to our conclusion. Apple has not been known for its modularity and expandability. Most components are soldered on and concealed within a sexy unibody chassis (or glued behind a 5K display). For a video professional today looking for a MacOS system, you must either step back to 2013 for a Mac Pro or settle on the built-in display of the iMac/MacBook Pro. Both are wonderful machines but lack in terms of customizability. Until Apple releases a new Mac Pro, the Mac Mini paired with a good eGPU is the most versatile Apple product on the market. Perhaps the most important lesson to learn from this exercise is the power of specialization. The iMac Pro will run circles around the Mac Mini when it comes to 3D rendering and Davinci Resolve work where more cores are being utilized. Thus we cannot say the Mac Mini is “better” than the iMac Pro. What we can say is, the Mac Mini is a better choice as a dedicated editing machine.
Written by Chris Workman, Editor


That part about using Macs Fan Control to fix the thermal throttling was a lifesaver for my own setup too, and it reminds me how sometimes the best solutions come from independent research rather than just trusting the default settings. Speaking of finding reliable tools, I recently came across kemo iptv when I was looking for a stable streaming option to watch tutorial videos while editing, and the service has been surprisingly solid for my needs. It's always a good feeling when you find that hidden gem that just works without breaking the bank.